Popular Content
Membrain for:
Data Autofill in Membrain allows you to automatically populate fields based on aggregated values from related records. Instead of manually updating totals, dates, or other numeric information, you can let Membrain calculate and maintain those values for you. This ensures your key fields stay accurate and aligned with what's actually happening in your sales process.
This article walks you through how to set up a data-based autofill automation using real-time information from other projects, tickets, or accounts.
To create a new Data Autofill, go to System Setup and open the Automations page. Click New, then choose Autofill from the options.

From there, select the custom field you want to automatically populate. This could be a number, currency, or date field—those are the only types currently supported for data autofill.

You’ll also need to choose which type of data generator to use. In this case, select Data, which allows you to calculate values based on existing records rather than generating text using AI prompts.

Once you've selected the field and the Data autofill type, define the data source. This tells Membrain where to look for the information. You can pull data from many parts of the platform, including Sales Projects, Account Growth Projects, Tickets, Flows, Companies, Contacts, Activities, or Documents.
Next, choose where this automation applies by selecting a target project type. For example, if you're updating a field in Account Growth Projects, select that as the context. Autofills only apply to one project type at a time.

You'll now decide when the autofill should run. Membrain gives you several condition options. You can update the field only if it’s empty, or you can choose to run the automation if the field hasn’t been updated for a certain number of days. This helps prevent unnecessary updates while keeping your data fresh.
You can also apply filters to narrow down which records should be affected. For example, you might only want to run the automation on projects in a specific stage or health category.

To determine where the data should come from, you’ll configure the relationship between the target record and the source data. This might mean pulling information from items that share the same company, are linked via a relationship field, or belong to a subsidiary.
For example, if you’re updating a field on an Account Growth Project with data from Sales Projects, you can define the relationship as “has the same company".

Now you’ll choose the specific field to use as the source data. For number or currency fields, you can select options like count, sum, average, min, or max. For date fields, you can choose the earliest (min) or latest (max) value. These options will vary depending on the field type you're updating.

Finally, schedule how often the autofill should run. You can choose hourly, daily, or monthly intervals, and define what time of day and which days of the week it should execute.

Once saved, the automation will begin running according to your configuration. You’ll be able to monitor its activity from the Automations page, where each run is logged and visible.
When editing the value of a supported field in Membrain, an Autofill indicator appears showing how many Autofill automations are connected to that field. Hovering over the icon reveals the configured Autofills along with their names and whether they are active.
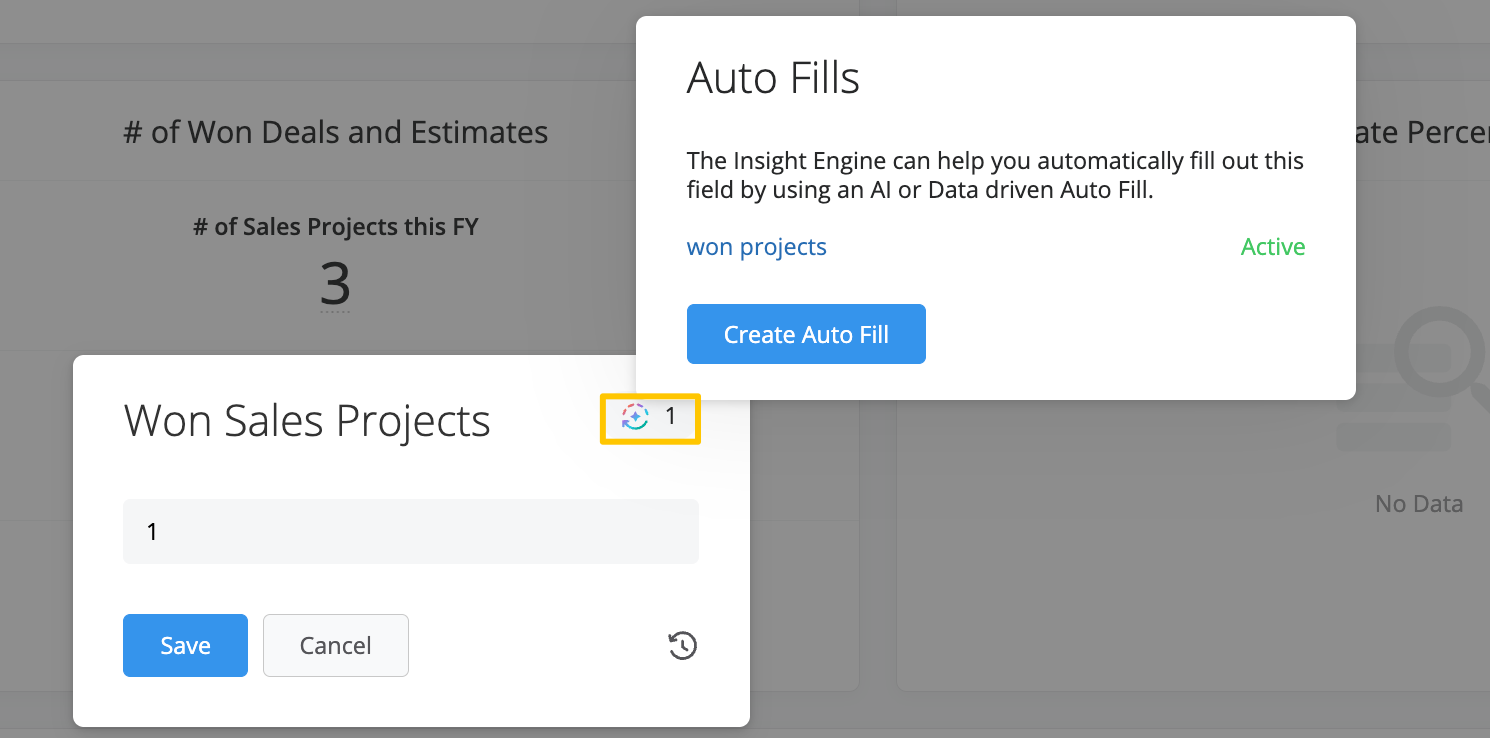
If you have permission to create automations, you can also create a new Autofill directly from this menu, without navigating to the Automations page.
Let’s say you want to track the number of Sales Projects associated with each Account Growth Project. You would:
Create a number field on the Account Growth Project
Set up a Data Autofill that pulls from Sales Projects
Define the relationship as “has the same company”
Use the “count” method to total up how many related Sales Projects exist
Set the automation to run every 30 days if the field hasn’t been updated
This ensures that the field stays current and reflects real sales activity, without needing to be updated by hand.
Data Autofill is ideal for keeping numeric fields up to date using actual values from across your CRM. Whether you’re counting projects, rolling up revenue, or syncing key dates, it gives you powerful tools to automate the work that often slips through the cracks.
If you want to learn how to set up an AI-based autofill using prompts instead, check out our article on that here.


