This article outlines how to add/remove users in Membrain, how to assign them to different Sales teams and Permissions groups and how to assign a specific Color to Users and Sales Teams. Only administrators of Membrain can add, edit or remove user accounts.
Create a New Team
To organize users effectively, you can create teams in Membrain. Follow these steps:
- From the left-hand side of your screen, go to
 System Setup > Users > Manage

- Click Teams in the top right corner.
- Select New Team.
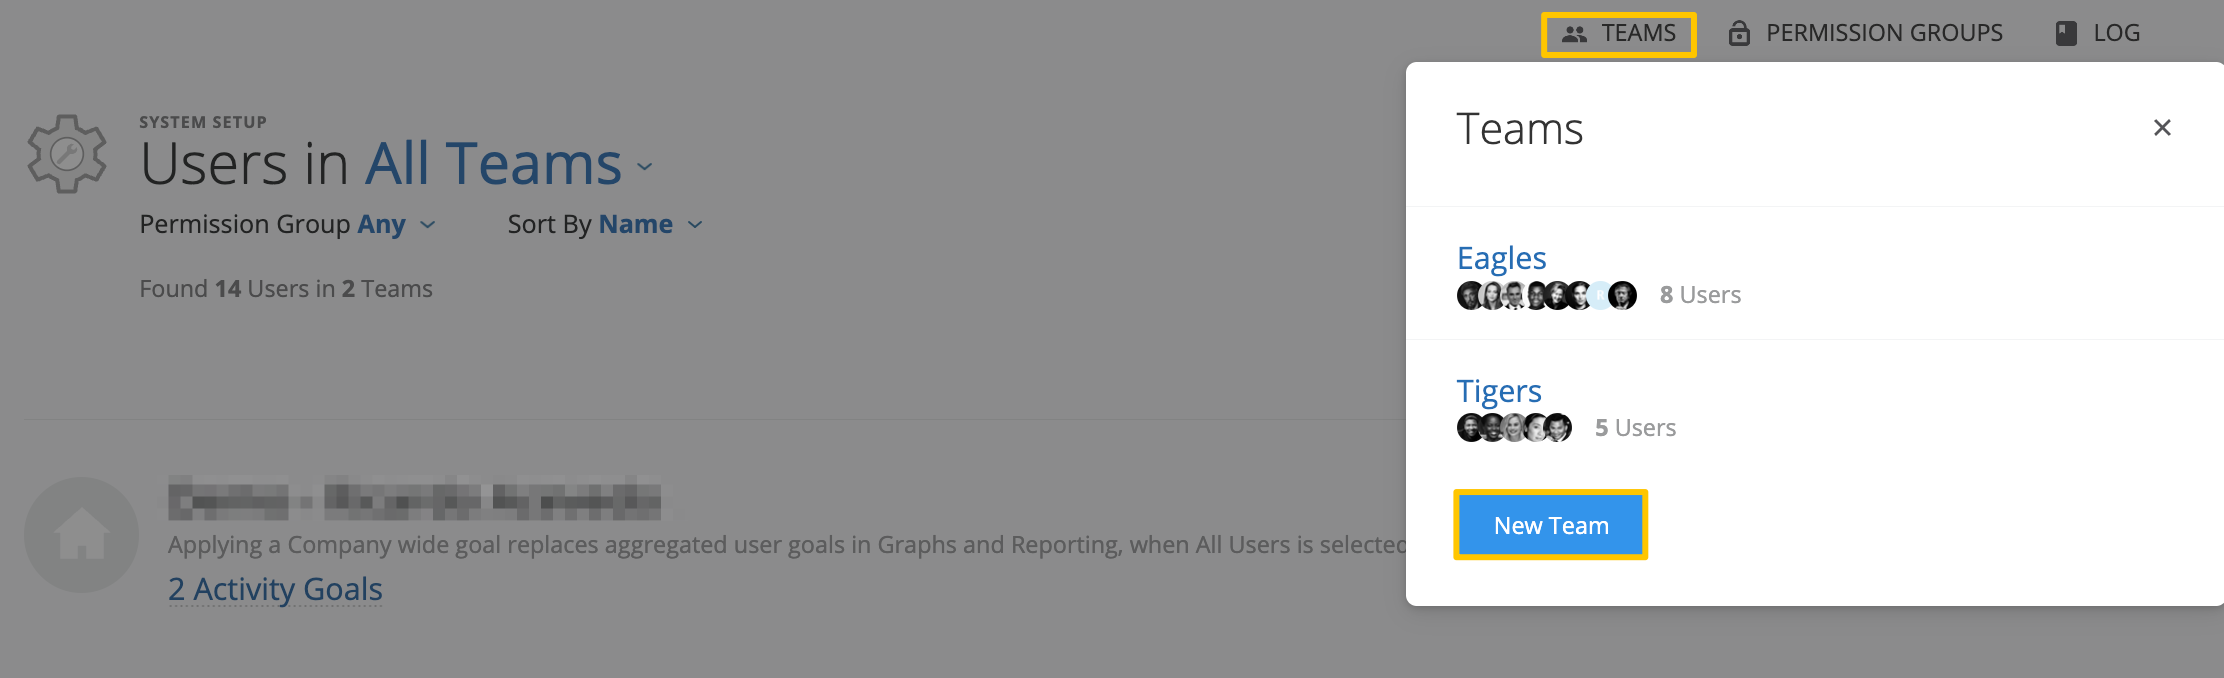
- Enter a name for the team and assign a coach if desired.
- Click Save to finalize the team creation.
Create a New User Account
There are 2 different types of user accounts in Membrain. Full and Lite users. Learn about the differences between the two in this article Full and Lite User Accounts.
- From the left-hand side of your screen, go to System Setup and select New User

- Enter the name of the user into the Contact field, and select from the drop-down list. If the contact doesn't exist yet, click New Contact to create a new contact.

- Add the email address for the new contact.

Note: Make sure the email address is correct, as this email address will become the new user's login username.
- Select the level of permissions this new user should have. The icons below the permission selected will show which modules the user will have access to.

- Select the correct Sales Teams this new user belongs to by choosing from the drop-down list.
- If you want the system to email an invite to the end-user, which allows him/her to set their own password, turn on the Send Invite toggle.

Note: This invite is only valid for 15 minutes but can be reissued until the user has successfully logged in.
OR
If you want to set a temporary password for the end-user and communicate to him/her the login details yourself, turn off the Send Invite toggle and complete the Password box.

- Turn on the Lite User toggle if you want your user to have a Lite User license, which gives him/her full access to the CRM but limited access to projects and other areas in Membrain. If you leave the Lite User toggle as turned off, the user will have a Full User license. Here you can read more about full/lite user licenses.
-
Click Add User.
Assign Colors to Users & Sales Teams
Assigning specific colors to Users and Sales Teams can be used to apply visual enhancement in analytical views in Membrain, such as graphs in Dashboards and the Performance view. Membrain will automatically assign a color when a new User or Sales Team is added to your Account.
To change the color that is automatically assigned, go to User Management in System Setup and click on the small color button beside the profile picture:


Managing Existing User Accounts
From the user management view, you can see all of your current Membrain user accounts. You can filter and group users based on which Sales Team or Permission Group they belong to by using the options at the top. You can also sort by specifics such as Quota Attainment or Win Rate for additional insight into your team's success.
- From the left-hand side of your screen, go to System Setup > Users > Manage
- Hover over their user account card until you see the cogwheel icon appear in the top-right corner.
- Click to see options such as:
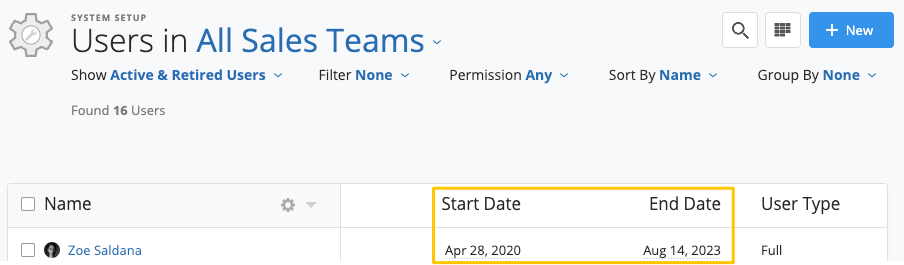
User List View
Membrain's User List View provides a comprehensive view of all user accounts in one place, allowing easy management and insight into the sales teams. This view can be accessed by pressing  in the manage users page. The list view can be extremely helpful and it has several features:
-
Sorting, Grouping and Filtering: Easily sort, group, and filter users by various parameters like Sales Team, Permissions, and Sales Coach for a more tailored view of your users.
-
Start and End Date Management: Within the User List View, administrators can see the Start and End Dates for each user. It allows them to note the timeline for every user, with an option to edit the Start Date. The End Date can be edited only if the user is listed as left company in the system, ensuring an accurate reflection of the user's status.
-
Quick User Actions: Within the list view you can also quickly make changes to some user details such as email, sales team, and their permissions
Users Log
The Users Log includes the following features for enhanced monitoring and management of user accounts, sales teams and permissions:
- Log changes to user accounts: Tracks creation and deletion of ueer accounts, as well as changes to user account licenses.
- Log changes to permission groups: Track permission checks, name changes, and adjustments to advanced permission scopes at the User Group Level.
- Log assignments of permission groups: Monitor when users are added to or removed from permission groups at the User Level.
- Log creation and deletion of permission groups: Keep a record of when permission groups are established or removed at the Instance Level.
Accessing the Users Log
- From the left-hand side of your screen, go to System Setup > Users > Manage or List depending on your preference for viewing user accounts.
- Click on Log located at the top right of the page. This log provides a detailed record of user accounts and permissions-related activities.

- A log of all the permission changes that have been made will open up. You can filter by specific permission changes by clicking on the blue "All Actions" text

Converting a User Account to a Full or Lite User Account
In Membrain, there are 2 different types of user accounts to choose from. Full user account and Lite user account. Read more about user account types in Membrain and their differences.
You can change the user type for an account to suit your needs, with a few simple clicks outlined below:
- From the left-hand side of your screen, go to System Setup > Users > Manage
- Find the user account you want to convert to a Full or Lite User.
- Hover over their user account card until you see the cogwheel icon appear in the top-right corner.
- Click on it to options available, and select to convert to a Full or Lite User.

Note: To convert a Full User to a Lite User you must ensure the account holder is not part of a Sales Team, is not the owner of a Prospect, Sales Project, Account Growth Project, Ticket or Flow, is not the Account Manager for any Companies, and has no goals assigned to them.
Delete a User
There are three different ways you can delete or remove a user from Membrain. Each option deletes the user's account, removes all login access, and removes all the user permissions and goals.
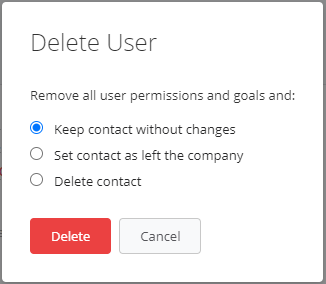
Choosing one of the options below also does the following:
- Option 1 - Keep contact without changes. No additional steps are taken once the user's account is deleted.
- Option 2 - Set contact as left the company. This will delete the user's account AND set the contact to "left the company" in that user's contact information in the CRM area of Membrain.
- Option 3 - Delete contact. This will delete the user's account AND delete the contact completely from the CRM area of Membrain.
Regardless of which option you choose, all historical information that was created or linked to this user will always be visible, just as it was when the user existed in the system.
Note: Any changes in the number of user accounts or account types must be in line with your current Membrain agreement. You can see details about your agreement and current usage on the
Account Details page of Membrain. Or reach out to
billing@membrain.com if you have any additional questions.


