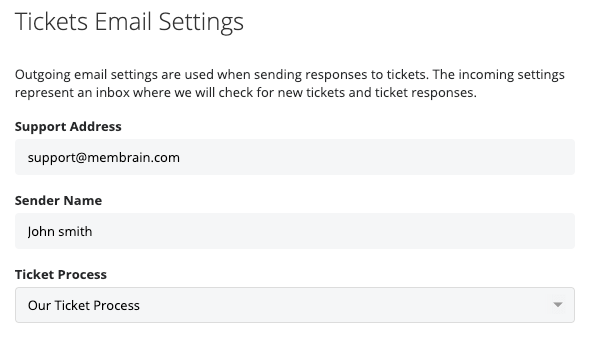
Upon starting with Membrain's Ticket Module, one of the key tasks you'll want to tackle is configuring your ticket email settings. You can find these settings in the System Setup page under the process capabilities tab. The adjustments you make here will influence the email responses connected to your tickets. More than just specifying the response source, you also have the option to enable automatic responses for new and updated tickets, adding a layer of efficiency to your ticket management procedure.
In the Support Address section, you're asked to specify the email address you'd like to use for managing ticket correspondence. This is the address that will handle both incoming inquiries and outgoing responses related to your tickets.
You can set up multiple email addresses, each linked to a specific ticket process. For example, you might use support@yourdomain.com for general inquiries and connect it to your Support ticket process. Similarly, you can use billing@yourdomain.com for billing-related queries, tied to a separate Billing ticket process. This allows you to automatically route incoming emails to the correct ticket process, helping you manage different types of requests more effectively.
The Sender Name section allows you to establish the identity that your customers see when they receive responses to their inquiries. This name is what will appear in the sender field of outgoing ticket-related emails.
The Ticket Process section is where you'll determine the default process for any newly created tickets. Setting this up correctly ensures a seamless workflow from the moment a ticket is generated.
Don't have a Ticket Process yet? No worries! Click here to learn how to create a process.

In the Outgoing and Incoming Ticket Email Settings sections, you'll be asked to manually enter the IMAP and SMTP information about your email servers. This part of the process involves a bit more technical detail and requires precise information to ensure the effective functioning of your ticket system. If you're unsure of what to enter, it might be beneficial to seek assistance from someone in your IT department. They should be equipped with the knowledge necessary to help you with these configurations.

Integrating your inbox with Membrain's Ticket Module enhances your ability to manage customer service tickets efficiently. This simple guide will walk you through setting up an inbox that uses OAuth to work seamlessly with your ticketing system, ensuring effective communication with your customers.
Due to changes in Office 365 authentication policies, SMTP basic authentication is being permanently disabled, and SMTP is generally not enabled by default. To address this, Membrain supports a method to send emails via Office 365 using Exchange Web Services (EWS) with OAuth 2.0 authentication.

With these settings under the Outgoing Ticket Email Settings section, Membrain will use EWS to send emails through Office 365, providing a secure alternative to traditional SMTP.
By following these steps, you effectively integrate your OAuth inbox with Membrain's ticketing system, streamlining your email management and enhancing your team's efficiency in responding to customer inquiries. Remember, if you encounter any difficulties, consulting with your IT department or reaching out to support@membrain.com can provide additional assistance.
Take advantage of automated responses to ensure timely and consistent communication for your ticket queries.
You can select from previously crafted templates that automatically respond to customer interactions. Learn more about creating templates, here.
There are two distinct auto-response options at your disposal:

This feature allows you to block specific email addresses or even entire domains, preventing undesired interactions from flooding your system. When an incoming email matches any of these rules, no tickets will be created. This is particularly useful to ward off spam or irrelevant emails, ensuring your attention remains on valid tickets. You can specify these unwanted sources in two ways: either inputting a full email address such as fake@fakedomain.com, or using a wildcard to block all addresses from a certain domain by entering *@domain.com. By effectively managing your blacklist, you can keep your ticket system focused and clutter-free.

From north to south, east to west, Membrain has thousands of happy clients all over the world.


