Membrain Automations is a powerful process tool that helps to minimize human error and time spent on repetitive tasks, reducing the need for manual input and increasing efficiency. It can also help improve and maintain the quality of your data.
When should you use Membrain Automations and why is it important?
Automations in Membrain can be incredibly helpful, in the right situation. When you have something that is scalable and reproducible, Automations can be a great way to improve your output. They can scale beyond what humans are able to do, making it a valuable tool for any business. When used right, automating tasks can free up employees' time so that they can focus on more value-added activities and ensure nothing slips through the cracks.
How does Automations work and what can you automate?
Automations work by combining something that triggers enrollment with one or more actions, or "Steps". The Enrollment trigger is what will start the Automation, and the steps are what the Automation will do. With your rules set up, testing is crucial to make sure everything is working as it should. Automation can save you a lot of time and effort, but only if it's done correctly.
Prospects, Sales Projects, Account Growth Projects as well as Companies and Contacts can all be enrolled in Automations, and there are many things to consider when deciding whether to automate or not. But if you have a process that meets those criteria, this tool can be a great asset.
Once you've created your Automation Steps, and applied the suitable Enrollment settings, all you need to do is sit back and relax while Membrain Automations does its job!
Considerations before you get started
As mentioned before, Membrain Automations is an incredibly powerful tool and it does exactly what you tell it to! You'll need to keep that in mind when you consider creating Automations since changes made by an Automation cannot be undone. What you build into an automation can impact many of your colleagues or clients, in both good and bad ways, so it's important to be clear and concise in any condition.
Here are a few things you'll need to keep in mind when you're considering the use of Membrain Automations:
- Limit who can create, edit and delete Automations. This is not a feature that should be open to anyone, to experiment with freely.
- Think through what types of data you want to automate and have a clear idea of what actions you want to automate.
- Sketch it out to visualize your plan.
- Make sure you know who an Automation will help, but also how and why.
- Take into account who might be impacted if the Automation changes things that cannot be recovered.
- Consider the possibility of incorporating what you're trying to do, in a more limited way (for example via Automated Events or Rules in one or more of your processes).
- Run your ideas past a colleague and even your team lead to ensure you have sign-off on your plan.
- Ensure that all those affected by the changes you want to automate know about the plan, what the Automation will do and how it will impact them.
- Create test data in your Membrain environment that can be sectioned off, for testing your Automation.
Once you've done all this, you can begin creating the rules and steps of your Automation, according to the guide below.
Note: Before you activate a new Automation please reach out to our
Support Team! We'd love to advise on how you best go forward if you have questions or considerations about Automations.
Enrollment
To start to automate anything, you will enroll the things you want to affect in an active Automation. Enrollment can be done in a different ways: Automatically through Enrollment filters or Automated Events. Or manually through the Process or on an individual basis.
- Automatic Enrollment can be done by Setting up Filters, when the criteria of that filter matches something in Membrain it will be enrolled, this is running continuously and you can set up how often it runs (not more often than every 5 minutes)
- Another automated Enrollment method is using Automated Events in the Process.
- If an Automation is desired at a specific point in the Process you can use the new Enrollment process tools.
- You can also manually enroll anything in Membrain by going to the "Automations" section on the bottom right-hand side of an individual Prospect, Sales Project, Account Growth Project, Ticket, Company or Contact.

- And see the status of the enrolled Automations at play by hovering over the names of the Automations in this place.
Permissions for Enrolling in Automations
As mentioned previously, it's important to limit which users are able to create, edit, and delete automations. For that reason, Membrain makes it easy to manage these exact user permissions. The ability to limit viewing and editing capabilities to specific Automations is also possible (see more under How to set up an Automation, further down in this article).
To ensure secure and controlled access, the following permissions exist:
-
Enroll Prospects in Automations
-
Enroll Sales Projects in Automations
-
Enroll Account Growth Projects in Automations
-
Enroll Tickets in Automations
-
Enroll Flows in Automations
-
Enroll Companies and Contacts in Automations

Note: The Automations enrollment box will only display on the relevant pages if the permissions are enabled. These permissions can be set from the User Management page. Learn about how to set permissions for individual users
here.Permissions On Permissions Off


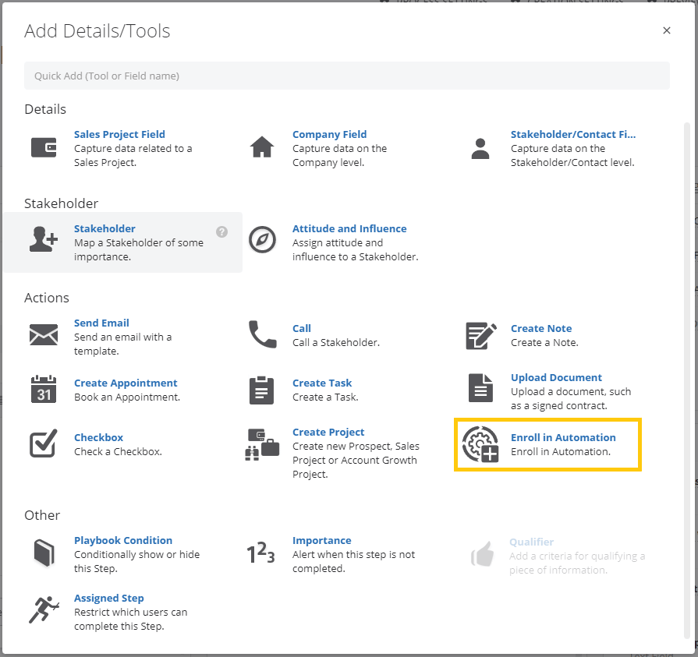
Types of Steps
There's is a wide range of Steps available in Automations, all available options are listed and explained below.
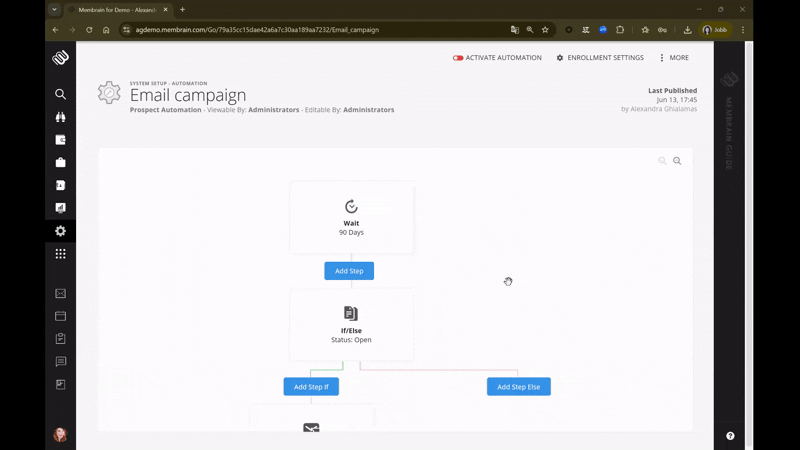
- If/Else - Sets up a filter for the If branch. Every item that doesn't match this filter will fall to the Else branch.
- Random - Input the percentage that the next step will be step A vs B.
- Wait - Wait a set number of Minutes, Hours or Days between Steps.
- Send Internal Email - Send an Internal Email to any set User, using an Email Template and/or an Email Style. Email Templates can include Content Hub items and Embedded AI Prompts, allowing content to be dynamically generated when the template is used.
- Send External Email - Send an external email to any set Contact or Stakeholder from project using an Email Template and/or an Email Style. Email Templates can include Content Hub items and Embedded AI Prompts, allowing content to be dynamically generated when the template is used. Choose who to Send As (e.g. the Sales Project Owner, the Sales Project Owner's Coach, the Company Account Manager, a specific User or even a Shared Email Send Account).

Additionally, if you wish the sent email to be saved as an activity in Membrain and tracked for interactions (openings, clicks) you will need to enable the respective toggles inside the automation step.

- Enrich - Automatically enrich Company, Parent Contact, All Stakeholders, or Stakeholders in specific Roles depending on the type of Automation being created. The Enrich step retrieves and updates data using your configured external data provider through Insight Engine, helping keep company and contact information up to date automatically.
- Set Process / Stage / Step - Change what Process and/or Stage and/or Step a Project is in or at.
- Set Status - Automatically change the Status of a Project.
- Set Field Value - Set the available standard or custom fields (based on what kind of Automation you are creating) to a specific option.
- Add Label - Add a Label to Companies, Contacts or other custom Labels locations you've created (for example adding a Customer label to a Company when a Sales Project has been won).
- Remove Label - Remove a Label from Companies, Contacts or other custom Labels locations you've created (for example removing a Prospect label from a Company when it becomes a Sales Project or Customer).
- Set Owner - Set specific Owners or Teams to be assigned to Projects. If Owner is set to a Team or to multiple users the Owner will be assigned Round Robin alphabetically. The "Owner" field also includes an option to select "Internal Stakeholders." This allows the possibility to use an Internal Stakeholder as the Owner in auto prospect, sales project, and account growth project creation.
- Set Internal Stakeholder - Assigns an Internal Stakeholder to Projects. Unlike Owners, Internal Stakeholders have a vested interest but don't manage the project. This option allows you to specify the role of each internal stakeholder in your project, whether it's a manager, supervisor, or team member.
- Send Message to Guide - Sends a specific notification to Membrain Guide notifying a specific User, internal Stakeholder, Owner, Owner Coach, Account Manager of a change based on Automations.
- Send Message to Slack - Sends a specific notification to Slack (provided the Slack integration has been enabled) notifying a specific Contact or Channel of a change based on Automations.
- Send Message to Microsoft Teams - Sends a specific notification to Microsoft Teams (provided the Microsoft Teams integration has been enabled) notifying a specific Contact or Channel of a change based on Automations.
- Send Webhook - When you choose the "Send Webhook" step, a new modal dialog appears. Here, you can define two crucial elements for your webhook:
- Webhook Endpoint: This is where you input the endpoint path for the webhook.
- Fields: A drop-down menu allows you to select Custom Process and Company Fields to include in your webhook payload.
This functionality makes it incredibly easy to connect Membrain with other systems, sending tailored data where it's needed most.
- Enroll in Automation - Enroll an object (e.g. a contact, company, or project) in an Automation based on another Automation trigger.
- Unenroll from Automation - Unenroll an object (e.g. a contact, company, or project) from an Automation based on another Automation trigger.
- Create Task - Assign a Task to a specific User, internal Stakeholder, Owner, Owner Coach or Account Manager. Set the content, select Activity Type and Deadline (days from when the Task is created, leave empty if no Deadline is desired) of the Task.
- Create Prospect - Creates a new Prospect in a specific Process, both Unassigned or with a set User or Team as Owner. Choose what to copy of available Information, Documents, Stakeholders and Contacts (some things might not be able to be copied over depending on your process settings).
- Create Sales Project - Creates a new Sales Project in a specific Process, with a set User or Team as Owner. Choose what to copy of available Value, Products, Information, Documents, Stakeholders and Contacts (some things might not be able to be copied over depending on your process settings).
- Create Account Growth Project - Creates a new Account Growth Project in a specific Process, with a set User or Team as Owner. Choose what to copy of available Value, Information, Documents, Stakeholders and Contacts (some things might not be able to be copied over depending on your process settings).
- Create Ticket - Creates a new Ticket Project in a specific Process, with a set User or Team as Owner. Choose what to copy of available Information, Documents, Stakeholders and Contacts (some things might not be able to be copied over depending on your process settings).
- Create Flow - Creates a new Flow Project in a specific Process, with a set User or Team as Owner. Choose what to copy of available Information, Documents, Stakeholders and Contacts (some things might not be able to be copied over depending on your process settings).

How to set up an Automation
Before building your first Automation we strongly recommend you study the entirety of this article. Changes performed by Automations cannot be undone!
- Go to System Setup.
- Scroll down to the API, Forms, Beacon, and Automations section.
- Click on Automations and then New.
- Choose what type of Automation you want to create (Prospect, Sales Project, Account Growth Project, Ticket, Company or Contact).

- Name your Automation and specify who it should be made Available To i.e who should be able to View and/or Edit the specific Automation.
The standard setting for the Available To is the current user "Me". In order for other user(s) or team(s) to be able to view and/or edit the Automation this setting needs to be adjusted.
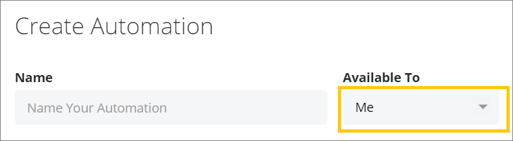
Note: The user(s) and/or team(s) that you will select here, must have the Automations feature enabled in ther User Permissions.
- Add one or more Steps.
- Navigate large Automation maps by grabbing and dragging or by clicking and holding down the left mouse button. Zoom in and zoom out by scrolling the mouse wheel.
- Publish your Automation.
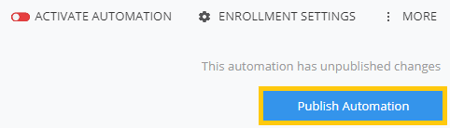
Note: Publishing the Automation does not activate Automatic Enrollment, it only makes it accessible in places within Membrain where you can use Automations.
Apply Enrollment Settings
To apply Automatic Enrollment Filters and set up Automatic and Repeat Enrollment intervals for your Automation, click on the Enrollment Settings button on the top right corner of the Automation page.

- Add Auto Enrollment Filters by picking an existing filter or creating a new one.
- You can also add Exclusion Filters to better limit the section of data where the Automation is applied.
- Choose if you want the Automation to enroll automatically with an interval of a number of minutes, hours or days (minimum of 5 minutes).
- Choose if you want the Automation to enroll once (default option) or repeat with an interval of a number of minutes, hours or days (minimum of 5 minutes).
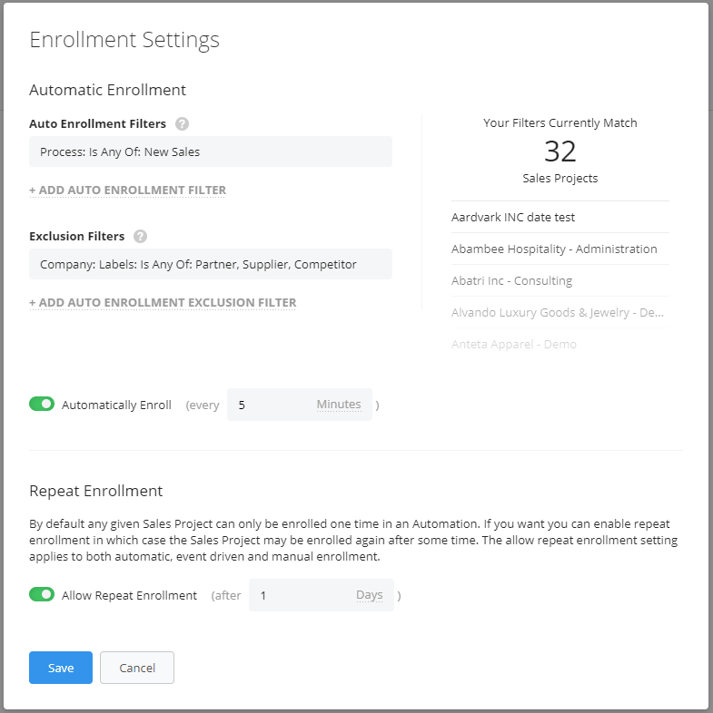
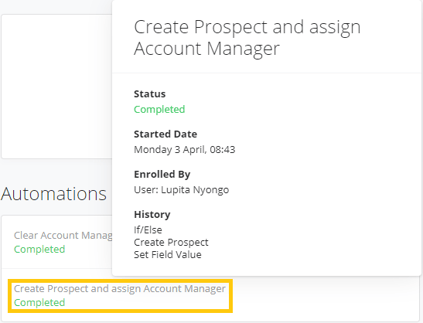
Example: In this case the Automation will ONLY enroll the Sales Projects that are part of the "New Sales" Process and where the Company Label isn't any of Partner, Supplier or Competition. Every 5 minutes, the Automation will check for these rules, and will enroll any matching Sales Projects. After completion of the automation steps, the previously enrolled Sales Projects will be allowed to re-enroll into that same Automation, in 1 day intervalls.
Activate your Automation
Once you are happy with your Automation Steps, Automatic Enrollment Filters and Intervals you need to activate the Automation for it to start. You'll find this toggle next to the Enrollment Settings button at the top right corner of the Automations page.

Or in your Automations Main View, where you see the list of all your Automations, whether they are active or not, but also what types they are, when they were last enrolled and more.
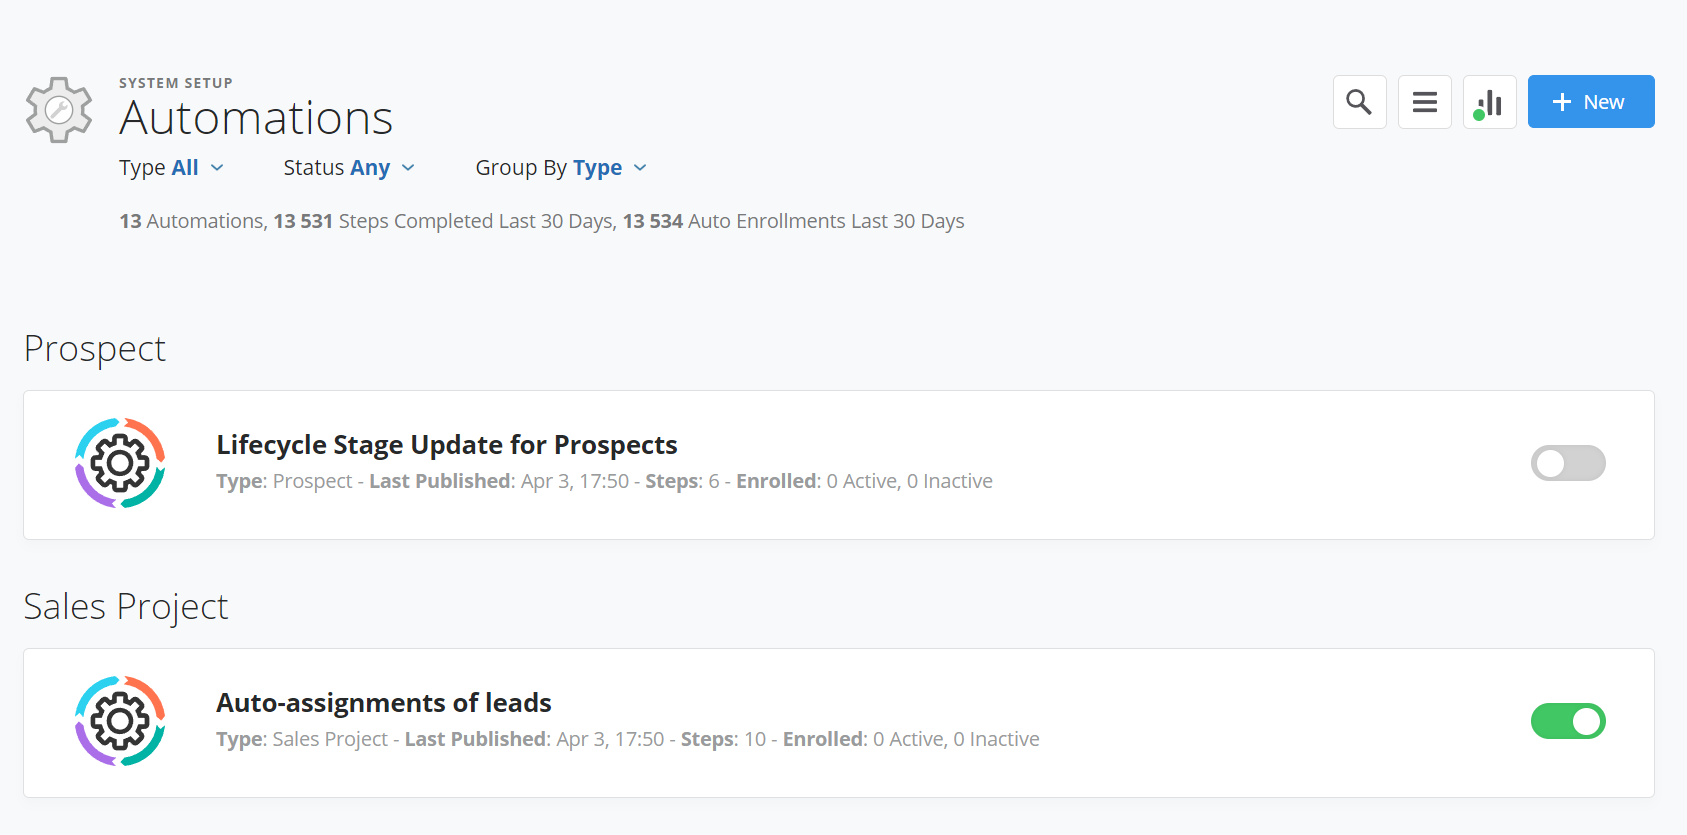
Managing your Automations
From the Automations' main page you have access to the following tools.
- Copy an automation
- Delete an automation
- Activate/Deactivate an automation
- Reporting & Logs
Click here to learn more on how to manage your automations.
FAQ and Considerations
- If something goes wrong, can I undo what the Automation changed?
- No, you cannot undo changes performed through Automations. For this reason it's very important to make sure you think through what you want the Automation to do and test it before applying it to your live data.
- Can I access older versions of an Automation?
- Yes, you can see a list of your previously published versions of an Automation by clicking on MORE and then History, in the Automation you are in. From there you can also opt to re-publish an older version or revert to the most recently published version.

Please reach out to our Support Team if you have any questions or considerations about Automations!
Some Use Cases
Scenario 1:
Assigning new cold leads (Prospects) equally between team members
- Step 1 - Random (each Random step has two possible outcomes, more Random steps can be applied to each outcome for multiple choices)
- Step 2 - Set Owner

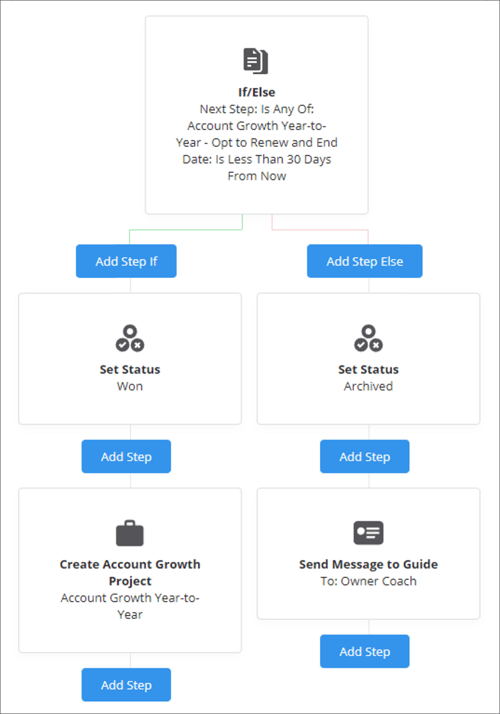
Scenario 2:
You run Account Growth Projects on a year-to-year basis and you want them to Automatically Renew or Archive based on specific conditions
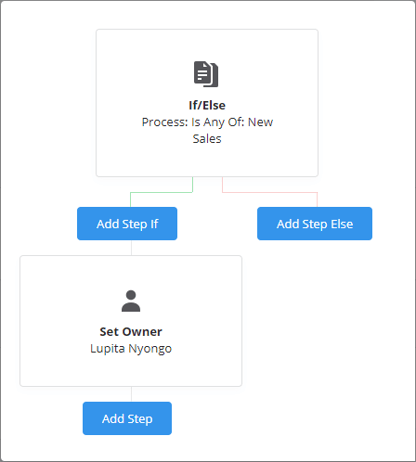
- Step 1 - If/Else
Add filters to the "If" branch, like a set number of days till End Date, or a specific conditional Next Step in the Process that is only available if a Customer has opted to Renew. Everything else will fall into the "Else" branch.
- Step 2a - Based on the "If" filters in the previous step you can add the step - Create New Account Growth Project
This branch can then have sub-steps appropriate to this outcome, like Messages to Membrain Guide, automatically sending internal or external Emails to team members, the Owner coach or specific Contacts/Stakeholders associated with the customer.
- Step 2b - Based on the excluding factors of the "If" filters in the previous step you can add the step - Set Status and choose "Archived"
This branch can then have sub-steps appropriate to this outcome, like Set Status to Archived when End Date has passed or Send Email to the team coach. Maybe this outcome should also Create a Prospect for later processing.
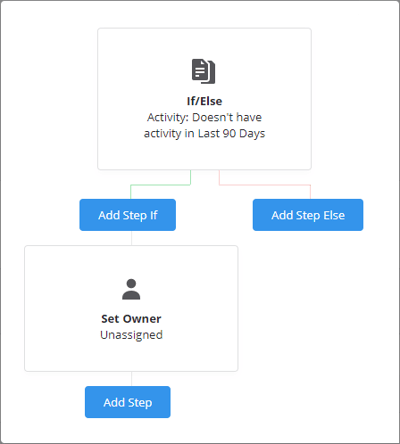
Scenario 3:
Clearing the Owner of inactive Prospects
- Step 1 - If/Else
Add Filter - Activity
Condition - Doesn't Have Activity
Type - Any or all of: Appointment, Task, Call, Mail or Note
Activity Type - Any or all of: Absence, Administration, Appointment, Email, First Meeting, Internal Meeting, Note or Phone Call
Period - Chose from available standard options (for example the last 30 Days) or specify a date range.
- Step 2 - Based on the "If" filters in the previous step you can add the step - Set Owner: Unassigned
Scenario 4:
Automating Follow-up Emails Without Interrupting Weekends
- Step 1 - Wait
In your sales automation, you add a 'Wait' step configured to pause for three days. By default, all days from Monday to Sunday are available, but you can fine-tune this.
- Step 2 - Set Days and Time
Within the 'Wait' step, you choose to only include business days (Monday to Friday 9am-5pm). This ensures that if the third day falls on a Saturday or Sunday, the next step (sending a follow-up email) will not be triggered until the next available business day.
- Step 3 - Set Time Zone
Verify that the time zone is set to your customers time zone. Your Membrain Instance Time Zone is the default.
- Step 4 - Send External email
Select which user the email will be sent from, who the recipients will be (based off of external stakeholder roles), and an Email Template and/or an Email Style.
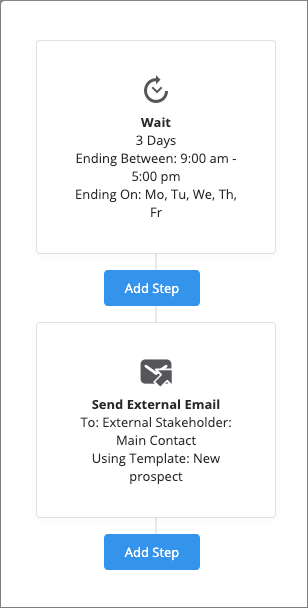
Additionally, if you wish the sent email to be saved as an activity in Membrain and tracked for interactions (openings, clicks) you will need to enable the respective toggles inside the automation step.


