Popular Content
Membrain for:
List Views allow you to organize and work with your data in a structured and flexible way. By adjusting how information is displayed, sorted, grouped, and filtered, you can focus on exactly what matters in your workflow.
All configuration options are accessible directly within the view, making it easy to adjust how your data is presented without leaving the page.
List Views are most useful when you need to work with detailed data across multiple records. For example, you might use a List View to review pipeline data, update multiple records, or analyze specific fields across projects or contacts.
By combining filters, sorting, grouping, and field selection, you can shape the view to match your task and work more efficiently with your data.
At the top of the page, you’ll see tabs representing some of the views available to you. These tabs give you quick access to saved views, including those you have marked as favorites or set as default. Learn how to mark a view as a favorite by reading our article on Views.
If you hover over a tab, you’ll see whether it is a favorite or a default view. This helps you quickly identify and switch between your most relevant views.
To access additional views, click the Navigator icon at the end of the tabs. This opens a panel where you can browse and switch between other available or recently used views.

Below the tabs, you’ll find some quick filters for the list. These filters include Owner, Process, and Status. These filters allow you to quickly narrow down the data shown in your list.
Next to these filters, you’ll find the View Settings button. This is where you control how your list is structured and displayed.

Click the View Settings button to open the configuration panel on the right-hand side of the screen. This panel brings together all options for customizing your List View.
The panel is divided into two sections: Settings and Filters. Each section can be expanded or collapsed depending on how much detail you need.
The Settings section controls how your data is displayed.
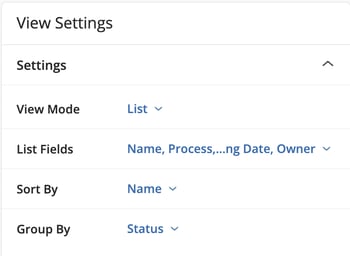
You can change the View Mode depending on the context you are working in. In a List View, this ensures you are viewing your data in a column-based format.
You can also define which fields are shown in your list by selecting List Fields. This opens a dialog where you can choose up to 20 fields from across processes, companies, contacts, and other related data. This allows you to tailor the list to show only the information you need.
Sort By lets you control how the list is ordered, while Group By allows you to structure the list into logical groupings based on selected criteria.
The Filters section allows you to further refine the data shown in your list beyond the always-visible filters above the table.
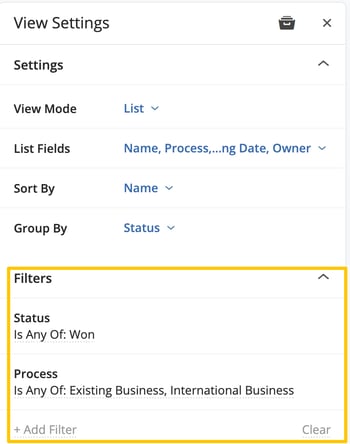
You can add filters based on specific fields to narrow your results and focus on the most relevant records. This is especially useful when working with large datasets or preparing targeted updates.
List Views are designed not just for viewing data, but for working with it efficiently.
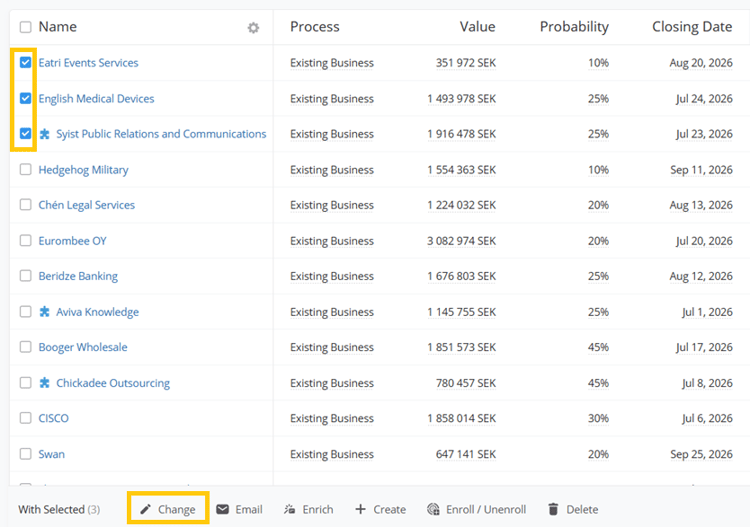
You can update information directly in the list without opening individual records. Click into a field and make your changes, and the updates will be saved in the system. This makes it easy to correct data, fill in missing information, or quickly review records.

You can also update multiple records at once. Start by selecting the rows you want to update using the checkboxes on the left. You can select individual rows or multiple rows at once. Then, click the Change button to update fields across all selected records. This is useful for tasks such as reassigning ownership, updating values, or adjusting key fields across multiple entries.
Additional bulk actions may be available depending on the type of list you are working in, such as sending emails, enriching projects, enrolling/unenrolling projects into automations, deleting records, or creating new projects in any of your purchased workflows (prospects, sales projects, account growth projects, tickets, flows).