Popular Content
Membrain for:
In any customer service setting, handling service requests and issues efficiently is key. Membrain's ticketing system is a straightforward tool designed to help manage these tasks. It allows teams to collaborate, solve issues, and provide quality customer service. This system traces every interaction from the moment a ticket is received until it's resolved. This article gives a detailed overview of the ticket interface and its functionalities. Regardless of whether you're familiar with Membrain or are a new user, this guide is intended to aid you in understanding and navigating the system effectively.

At the top of the ticket interface, you'll see important details:
Ticket Number: A unique identification number automatically assigned to each ticket. This number helps in tracking and referencing the ticket during discussions or searches.
Ticket Name: This is a descriptive name for the issue or request related to this ticket. It can help to keep things organized, especially if you are managing multiple tickets at the same time.
Company Name: The company that the ticket is associated with. This provides context and helps identify the source of the issue or request.
Related Icons: Next to the company name, you'll see icons for Prospects, Sales Project, Account Growth, and Ticket. These icons provide quick links to other interactions with the company. Hover over these icons for more details, and click to navigate to the respective items.
Process: This shows which ticket management process this ticket is associated with. You can define different processes for different types of tickets, which can be helpful for managing various types or complexities of tickets.
Status: Reflects the current state of the ticket. The status can be 'New', 'Open', 'Pending', 'Resolved', or 'Archived', allowing you to understand at a glance where the ticket stands in the resolution process.
Priority: Indicates the urgency of the ticket. Setting a priority helps teams manage their workloads effectively, addressing the most critical tickets first.
Owner: The person who is responsible for handling and resolving this ticket. This is typically a member of your team who has been assigned to work on the ticket.

The toolbar at the top of the ticket Product Extension is filled with activity creation functionalities. Here, you can create calls, notes, appointments, or tasks related to a ticket. Email is handled via the Respond Button. This toolbar is always visible, providing you with constant access to these options even as you scroll down the page. If you'd like to learn more about activities in Membrain, read our article on managing activities!
Responding to tickets appropriately is crucial. To ensure that email responses are managed correctly in the related ticket, and sent from your support email address rather than from the individual replying to the ticket, always respond using the "Respond" button within the ticket.

The ticket can have five different statuses:
New: The ticket has been created but has not yet been addressed.
Open: The ticket is open and awaiting a response from your team.
Pending: Your team has responded, and you're waiting for a reply from the customer.
Resolved: The ticket is closed, having been solved.
Archived: The ticket is closed, but not solved. This can be a useful way to handle spam or invalid tickets.
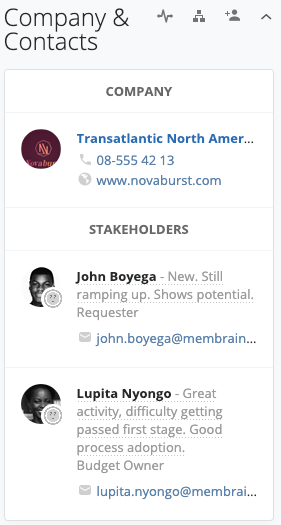
On the right-hand side of the ticket, you'll find contact details for both the company and the relevant contacts for this ticket. You can also add key contacts as stakeholders in the ticket. When you add stakeholders, they will automatically be cc'd in your email responses. The additional actions available here allow you to add a contact to this ticket, view or edit the Decision Team Map or the Company Organizational Chart, and expand or collapse the list of Companies & Contacts. If you'd like to learn more about stakeholders in Membrain read our article on them here!
Below the process, there's a description box for each ticket. Depending on how the ticket is created, it can hold the following information:
Internally created:
If the ticket is created in Membrain, your team can provide and update a detailed description of the issue, helping to clearly communicate the customer's needs to anyone viewing the ticket.
Customer created:
If the ticket is created by a customer sending an email to your support email address, this will contain the email content. It can also be updated internally, as needed.

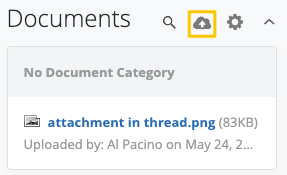
In this section, you can view and upload documents related to the ticket. This list includes documents that have been uploaded directly to the ticket, added during the ticket process, attached to activities, or received as email attachments. To manually add a document be sure to click the cloud icon that is highlighted below. You can learn more about managing documents in Membrain here!
The Details section is a dynamic component of the ticket interface that is activated when process custom fields are defined in the ticket process editor. It serves as a place to store critical specifics about each ticket. Keep in mind, this section will not appear if no process custom fields have been input in the process editor.
This section can encompass a wide range of information. You might outline the 'Ticket Category,' point out 'Related Projects,' or denote the 'Business Component' impacted. This pertinent data enhances understanding of each ticket's context, helping your team fully grasp the matter at hand.
Remember, the composition and layout of the Details section will directly reflect the process custom fields defined within your ticket process. It's an adaptable element that can mirror your organization's specific needs.
Want to learn how to populate this section? Our Building a Ticket Process article offers a detailed walkthrough on the process.
Although not necessary, the ticket process is a sequence of steps or actions that your team can take to address and resolve the ticket. This process can be customized according to your organization's standard operating procedures (SOPs), best practices, or specific ticket management strategies.
Each process is further divided into stages, which segment the ticket process into clear, manageable sections. These stages can help you understand how the ticket is progressing and identify any tickets that have reached significant milestones. Learn more about building a simple process here!

For unique situations on a ticket-by-ticket basis, additional steps can be added to allow you to manage each individual ticket in a unique way. If your Membrain instance has enabled the Dynamic Process Tools, you can click on the + sign which appears when you hover between steps, and add your own checkbox step, or the - sign to skip the step, as required.

For Ticket management in Membrain, the timeline is a key feature that enhances the tracking and resolution of customer service requests. It links to the activity stream, highlighting key actions and interactions that define the lifecycle of each ticket. As tickets progress through different statuses, the timeline provides an up-to-date visual guide of this journey, helping in quickly assessing the status and history of each issue.

Directly below the process, you'll find the Activity Stream. This is a chronological record of all past, recent, and future activities related to the ticket. It serves as a comprehensive history of every action taken, changes made to the ticket details, communications, and more. In the Activity Stream, you can also comment on activities to keep all discussions in context, and mention your colleagues to get their immediate attention on specific items. Learn more about the activity stream from our article on it here!


