The Content Hub is a great place to store all your resources, where you can have them at your fingertips in Membrain. It ensures that your sales team has the collateral (white papers, case studies, demo videos, and more) exactly when they should be sharing it in the sales process.
In this article, we will go through how to add your resources to the Content Hub, and how to add Context, to ensure the relevant resources are available right when you need them.
Where do I find the Content Hub?
You find the Content Hub itself in the Membrain Menu to the left, though the resources you add to the Content Hub will be available to you in lots of places throughout Membrain.
Click on the icon to go straight to the Content Hub, or hit H on your keyboard to jump straight there.

How do I add content to the Content Hub?
- Click on the Content Hub icon in the menu
- Click on the Add Content button
 at the top right-hand side
- Select the Content Type you wish to add. There are two different options- Sales Enablement Content and Sales Collateral. Learn more about the differences between the two in the Content Hub Introduction article.


- Next, upload your content. There are 4 options to choose from - Video, Link, Content Card or Files.

Add Video - choose this option to link to a video that is already hosted online on Vimeo, Wistia, or Youtube. When clicked on it will play directly within Membrain.
Each hosting provider has specific requirements when adding a URL to link to a video. Specific details are available during the upload process
Add Link - this option allows you to link to an external website or internal resources such as a Sharepoint file or network folder.
Add Files - upload files like Word, PDF, Excel files, etc directly into the Content Hub. You can either browse your local pc or simply drag and drop your files directly into the colored area. Go ahead and select multiple files to upload at once! Once your content has been added you will see it appear as a thumbnail.
Add Content Card - Content Cards are the perfect tools to provide your team with more context or necessary insights about a particular step, stage, or custom field. Whether it's in-depth information about a complex process step, important details for a specific stage, or added data for a custom field, Content Cards come in handy. They can be added to specific steps, stages, or custom fields in your sales processes. Read this article to learn more about how to use Content Cards.
- Click Done, and you're ready to move on to the next step.
Note: Collateral content (for sharing externally) is highlighted in Yellow.
Enablement content (for internal use) is highlighted in Teal.
What is Context, and why do I need to add it?
Once you've added your content, you need to "add context" to it. By adding context to your content - like a sales process stage, a stakeholder, or a specific industry - Membrain will recommend it to you in different places when it is most relevant. You can even mark the content you love as a favorite, so it's always easily accessible.
Once you have added some content, you will see it in the top row of the Content Hub in the Recently Added area and also in the Uncategorized Content area, until you add some context to it.
Note: Content without context won't be recommended. Add context and let the magic happen!
How to Add Context
There are lots of different ways to add Context to your Content, making it easy for you to add this all-important information to your Content. Choose the way that suits you best.
Add Context while you upload Content
This is the best way to keep your Content organized and always up to date. Adding context during the upload process ensures all your content is relevant and included in recommendations from the get-go.
- Upload a video, link, file or add a content card.
- Before clicking Done, hover over the Content you've just added.

From here you can edit the name and who the content is available to, delete the content, and add the contexts that are relevant, helping Membrain offer intelligent recommendations using all these factors, so you can share your content when it makes a difference.

Click on the Add Contexts button which appears on the thumbnail for your Content. Then, select from the list of all your Processes and their Stages, Activity Types, Stakeholder Roles as well as specific Companies, Contacts, Prospects, Sales Projects, Account Growth Projects and/or Tickets to add as context.
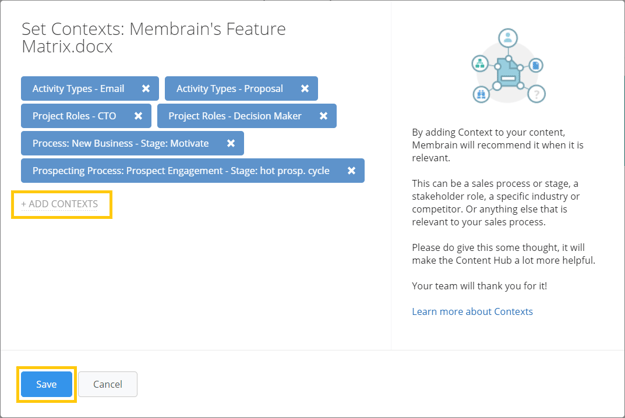
Custom Fields can also be added as context, for example, specific industry types, company size, or when certain competitors are chosen. Or you can get complex with it and use User Custom Fields to suggest different content based on the salesperson who is using Membrain.
- Continually manage these contexts as things change and keep your content recommendations up to date.
Add Context individually after you've uploaded Content
This is a good way to keep on top of Content that has been uploaded previously, or you are building up your Content Hub slowly but surely.
- Right-click on the content you wish to add context to.
- Select Set Contexts from the menu.

- Continue from step 4 above.
Add Context in Bulk
A time-saving option if you have lots of Content you wish to upload straight away that shares the same context.
- Select the content items you wish to add the same context to, they will show with a small tick in the top left of the thumbnail.

- Click on the "CHANGE" button up top.

- Turn on the "Change" toggle and select which context(s) you wish to add from the list.

- Save your changes.
Content Permissions & Accessibility
In Membrain's Content Hub, content items such as Collateral, Enablement, Links, Files, or Content Cards are not only easy to add but also customizable in terms of who can view and edit them. This ensures that your team members have the right access to the content they need.
-
While Adding New Content: Select the content type you wish to add and upload your content. During this process, you'll have the option to specify who can view and edit the content. By default, both of these options are set to "Everyone."

-
Editing Existing Content: Right click on the content item in the Content Hub. Click on Properties. This will allow you to modify the "Available To" settings for that item, provided you have the necessary permissions, edit contexts, favorite and get additional information such as engagement data.

Pin/Unpin Functionality
As an Admin, when you hover over any filter, a pin/unpin icon will be visible, allowing you to easily pin a filter for all users to have quick access to filters you deem essential. By pinning a filter, you're highlighting its importance and ensuring it stays prominently accessible within the Content Hub. This action helps to guide the sales team towards the most relevant content, facilitating a more efficient search process. Unpinning a filter, conversely, removes it from the immediate view but keeps it available for those who need it.
Congratulations! You have now successfully added contextual content and understand permissions in the Content Hub, and are ready to start using these resources from inside Membrain! Learn more in this article
How to use the Content Hub.


