Prospecting is the engine that drives a healthy pipeline and helps you reach your sales targets. As leads can be generated through multiple channels eg. inbound marketing campaigns, via social media and networking events, it's important to effectively manage them and keep on top of all the activity around your valuable prospects.
The Prospect List makes managing and working through a list of Prospects as smooth and efficient as possible. What makes this list view a real eye-opener, is the fact that you can customize it to your heart's content. Sort, Group, Filter, and Configure lists to show up to 20 columns of information at a time. And don't worry about having too much information on the screen, you can drag the data around with your mouse or touch screen to see all the information easily.
Once you're happy with your perfect List, save it as a View so all your settings and configurations are saved, ready to come back to just when you need it.
Another great feature of Lists is that information in these lists is not limited to just Prospects. You can also see additional details relating to any Sales Project a Prospect may be related to, as well as information that is stored on the Company or Contact. This gives you a great overview of Prospects and allows you to really see the specific information you need. Learn how to do this in the Working with Lists - Advanced article.
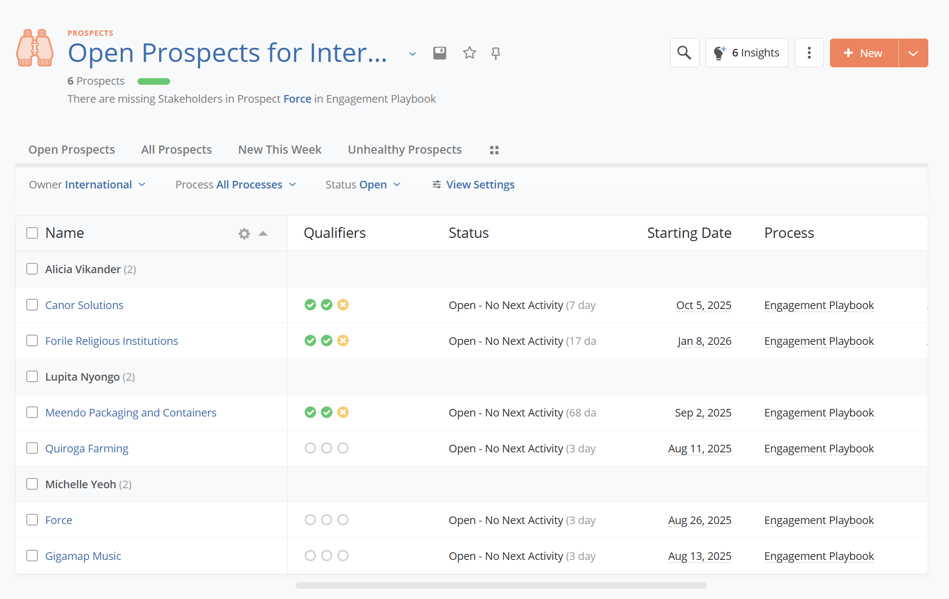
Click on the prospect name in the list to go straight to the Prospect page. This gives you all the details about this specific prospect and you can, among other things, find contact details, a field for entering notes, a tool to help you plan the next activity and the qualifying criteria which need to be addressed.
To learn more about the Prospect View, read this article here
The red, green, yellow or blue indicators in this column represent the questions asked of each prospect. For each prospect, certain criteria needs to be met before they can be converted to a Sales Project. As each qualifier is answered the system will advise whether this meets the qualifying criteria or not. If the criteria is met, the qualifier will turn green. If not met, it will turn red.
Click on the Find icon or hit F on your keyboard to go directly to a prospect and find it where it stands in this view.
Add a new prospect by clicking on the New Prospect button, top right. Here you can add Company, Contact, Process, and owner information.
If you spot some data that is incorrect or incomplete in the list, no problem! Go right ahead and edit the data directly in the list without having to leave the list your working on.
Just click on the field and start to type, and your data will be changed both in the list and also in the context where it is stored. A great way to spot check for errors or gaps in your information.
If you select an appointment or follow-up task, the prospect will automatically be "snoozed" in the list until the time you have set for your next action and you can move on to your next prospect. All snoozed prospects will automatically have a faded appearance and be moved to the bottom of the list. When the next planned activity is set to take place, the faded appearance will be removed and it is again moved towards the top of the list.
There are lots of options available to configure your list exactly as you want it, with all the specific data you are looking for.
View Settings let you tailor your Prospecting list to match how you prefer to work.
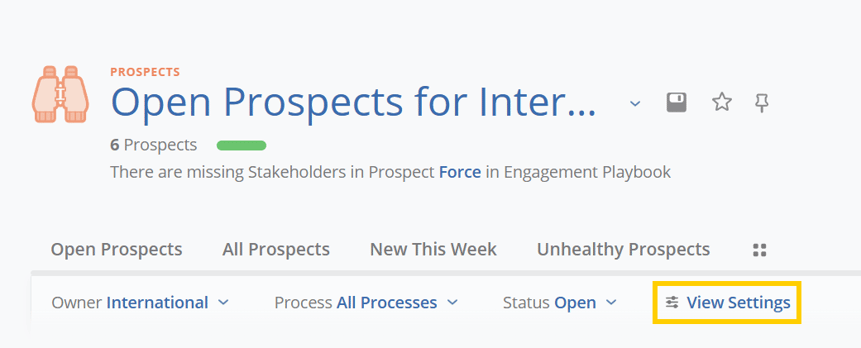
You can configure List Fields, Sort By, and Group By settings and apply multiple filters.

To learn about more ways to customize your list, read this article Working with Lists - Advanced
You can hover over the Prospect name to see a snapshot of the most important information such as rules, qualifiers, the engagement matrix, and customizable information found in a collapsible menu.
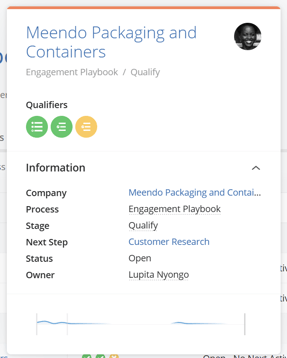
The information shown in the information tab is easily customizable allowing you to choose which information is shown and in what order. An administrator can customize this view, learn how in this article about Preview Fields.
Once you have created the list of Prospects you wish to see, you may want to export it to use in Excel:
From here you can specify additional fields to include in your export, as well as change the grouping and sorting, and save the configuration for use again.
When exporting the list view in P/SP/AGP/T, you can also select "Next Step" or "Last Completed Step" as Group By options in the Export dialog. These options allow you to group your sales projects by specific progress criteria, offering a more detailed perspective.
You can even make this export configuration available to your team or everyone in the organization to help streamline reports and save time across the board.
Likewise, you can upload a pre-saved configuration from this view also.
From here you can also import Sales Projects that exist in another system.
To learn more about Importing Prospects, read this article here


