Popular Content
Membrain for:
Membrain Forms is a tool that allows you to create forms directly from Membrain to gather different kinds of information in various ways. The information gathered in these Forms can then be used to create, for example, new Prospects from website visitors or create activities connected to already existing contacts in your Membrain database.
There are many ways Membrain Forms can be used, here are just a few suggestions:
Once you have your forms ready, you can either embed them on your website to capture information from your website visitors, or send them out as they are as a stand-alone link via email to your prospects, customers, and so on.
To start building your Membrain Form, go to Profile picture > System Setup > Membrain API, Forms & Beacon and click on the icon as shown below.
When a contact submits a Membrain Form, the information included is automatically populated in the corresponding Membrain fields for that contact, streamlining your sales and marketing workflows.
It can even create a Prospect, Sales Project, or Account Growth Project for that contact, automatically!
Creating a Membrain Form is quite easy and doesn't require a developer or web administrator. Follow these 5 simple steps outlined below and you're done!


To enhance your Membrain form’s security and reduce spam submissions, you can enable reCAPTCHA by toggling on the following button inside the form. When this button is activated, a reCAPTCHA challenge will appear just before the Submit button, helping to ensure that only real users can submit the form.


The Membrain Beacon can be embedded in a form to automatically identify the submitter and track their interactions with your website. When a contact submits a Membrain form containing the Membrain Beacon, their future activity on your website will be tracked and saved to the contact page in Membrain.
This allows your team to gain deeper insight into how prospects engage with your content at any given time. By capturing this behavioral data, sales teams can better understand prospect intent, prioritize follow-ups, and tailor their outreach based on actual interests and actions, ultimately supporting a more informed and effective sales process.
There may be cases though where you wouldn't like or need to identify the submitter, for instance that could be forms that are intended to be used internally at your company (e.g. order registration, partner lead registration, prospect creation, etc.).
Whatever the reason might be, you have the possibility to turn off the Membrain Beacon from a form, with one click, as shown in the screenshot above.

When the form is submitted, the submission is automatically logged in the Activity Stream on the Contact and Company who submitted the form. You can also specify what action Membrain should take after the form is filled out. For example, you can create a Prospect, Sales Project, Account Growth Project, assign a Task, or log a Note for the Contact.
Each of these actions represents an activity in Membrain, and you can capture additional information through custom fields within these activities.
In addition to selecting an action, the Create Only If option allows you to set specific conditions for creating Prospects, Sales Projects, or Account Growth Projects. This ensures that projects are only created when the defined criteria are met, providing more control over project creation. This functionality enhances flexibility by preventing unnecessary projects from being created, ensuring that only relevant ones are generated based on the conditions you set.


The Enroll in Automation option allows companies or contacts to be automatically enrolled in an automation when the form is submitted. You can choose from a list of available automations, which are categorized by type (e.g., Company Automations, Contact Automations).
This action is logged in the Activity Stream, keeping a record of the enrollment.
When a form is submitted, a notification can be sent to the people you've identified in this view. It could be the project owner, a marketing person that is specifically in charge of surveys, and/or a team if several people work on the same topic. You can choose from sending these notifications by email, to someone's Membrain Guide, and even to Slack, and Microsoft Teams.
To send an email notification:

To send a notification to Membrain Guide:

To send a message to Slack or Teams:

When someone has filled out a form on your website you can have a message shown to them and even embed an HTML link or images in it. Another option is to redirect the form submitter to a specific page on your website where people can find more information on some product or service that you offer.

Additionally, you can configure Membrain to send an immediate confirmation email to the form submitter, providing them with a summary of their submission or next steps. This email can be personalized to enhance the submitter's experience and maintain engagement.

Click Save or Save & Preview if you'd like to see first what your form looks like.
By default, the form design includes your company's logo and background as configured in the login screen logo & background settings found in System Setup. This ensures brand consistency across all your forms without extra effort. However, if you have tech staff with CSS knowledge, they can style these forms to make them more personalized and connected to your brand.
Click Save or Save & Preview if you'd like to see first what your form looks like.
Finally, when you're ready with creating the Membrain Form, you can embed it or share it.
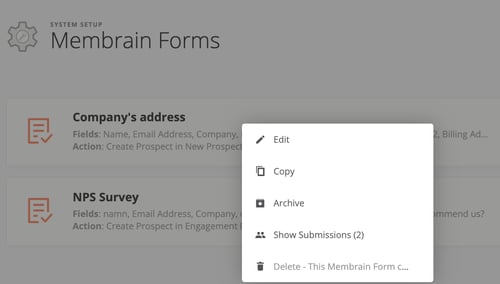
By simply right-clicking on a form in your list, you can access a variety of options to streamline your workflow. These include:
This right-click feature enhances your ability to manage forms efficiently, giving you more control with fewer clicks.
There might come a time when a form you've created is no longer needed or relevant. In such cases, Membrain allows you to delete the form. However, before you can proceed with deletion, you must first ensure there are no existing submissions for that form. Here are the steps to follow to do just that:
Navigate to System Setup and click on Membrain Forms.
Switch the view to display Membrain form submissions in a list view. This gives you a broader perspective and allows you to filter the submissions related to the form you wish to delete.
Use the Membrain Form filter to display only the submissions related to the form that you intend to delete.
Once your view is filtered, select all submissions by checking the box next to the "Name" column. This is a quick way to select all displayed submissions at once.
Click on the "Delete" option. This will remove all the selected submissions from your system.
Now that you have deleted all the submissions linked to the form, you can proceed to delete the form itself. This process ensures that no essential data is lost accidentally.
Membrain offers flexible options for exporting form submission data, making it easy to analyze or share insights with others. One approach is to create a graph within the dashboard that visualizes the form submission data, and then export this data into an Excel spreadsheet by clicking the actions button ![]() and selecting export data to excel. This method allows you to take the structured data from the graph and utilize it in external tools for further analysis or reporting.
and selecting export data to excel. This method allows you to take the structured data from the graph and utilize it in external tools for further analysis or reporting.
In addition to manual exports, Membrain supports automated reporting. By setting up an automated report, you can schedule regular exports of your form submission data. This is done by creating a dashboard report that includes your form submission graph, and configuring it to be delivered at regular intervals. Automated reports ensure that you always have up-to-date submission data available, reducing the need for repeated manual exports and improving efficiency.
In addition to the standard functionalities of Membrain Forms, there is a powerful feature available for more advanced applications: the ability to pass data into hidden fields within the form. This feature is particularly useful for tracking conversions from advertising campaigns or capturing custom data that you do not wish to display to the form submitter but need for internal processes.
You can modify the Membrain form embedding script to pass specific data into hidden form fields. This is especially handy for capturing information from various sources, such as Google Analytics or Google Ads, and then using this data within Membrain for more effective and targeted marketing efforts.
To utilize this feature, follow these steps:
Create a Field and Make it Hidden: First, create a custom field of text type and make it hidden in your Membrain form. This field must be created before building the form. Learn to create custom fields here.
Depending on your use case, the hidden field can be created on the company, contact, or project level (if your'e creating prospects for instance from your form submissions). Do not hesitate to contact our support for further guidance.
Modify the Embedding Script: Once you have your hidden field, you need to modify the embedding script of the form. An example modification looks like this:
MBBeaconFormCreate({
subdomain: 'your_subdomain',
element: 'your_element',
formId: 'your_form_id',
width: '100%',
height: 'auto',
data: {
'Person.CustomFieldID': 'VALUE_YOU_WANT_IN_THE_FIELD'
}
});
Replace 'your_subdomain', 'your_element', 'your_form_id', and 'Person.CustomFieldID' with your specific details. The 'VALUE_YOU_WANT_IN_THE_FIELD' is where you put the data you want to pass into the hidden field.
Tracking Conversion Data: By passing UTM parameters or specific campaign identifiers into a hidden field, you can track which marketing efforts are leading to form submissions.
Custom Data Capture: For internal workflows, you might need to capture specific data that isn’t relevant to the form submitter. This data can be passed silently into hidden fields for internal use.
Privacy and Compliance: Always ensure that the data you pass and capture complies with privacy laws and regulations, such as GDPR.
Technical Knowledge: Modifying the embedding script requires some technical knowledge. If you’re not comfortable with this, consult with your IT or web development team.


