An appointment in Membrain is any kind of meeting you have with a contact, prospect, stakeholder in a project, or even colleague internally. It may be over the phone, via online meeting or a physical face to face meeting.
Appointments can be created from lots of places in Membrain, though you will mostly create them from the Sales Calendar or within a Prospect, Sales Project or Account Growth Project. You can send invites to participants and even add a link to a Zoom online meeting or a Teams online meeting if required.
The Content Hub
Sales Enablement or Sales Collateral from The Content Hub is visible from the right-hand side of the appointment dialog during creation to guide salespeople as they work.
Track Activity Details
Additional information about the outcome of an appointment can be added after it has happened to help sales representatives log notes and track the next steps. Learn more about Activity Custom Fields.
Where can I see all my appointments?
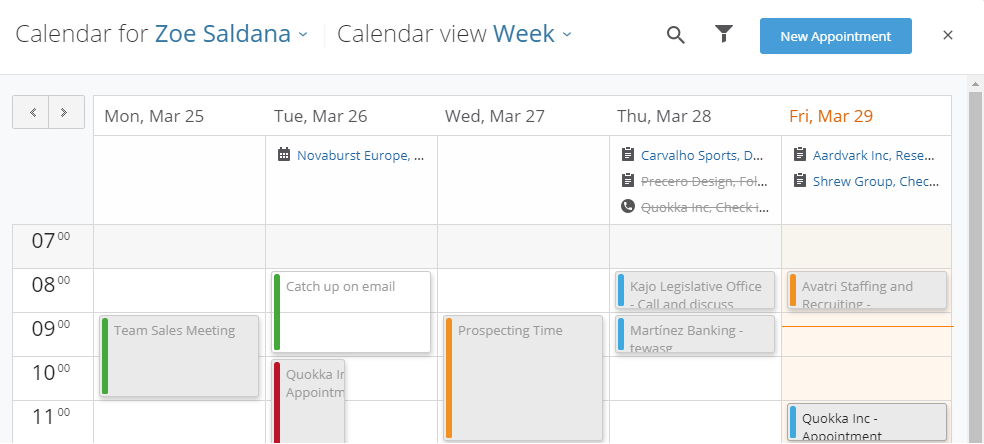
Appointments are visible in the Activity Stream of a related Prospect, Sales Project, Account Growth Project, Company or Contact and also in your Sales Calendar where you can view all your appointments in a day or week view, edit upcoming appointments and even drag and drop them to change dates or times.
Filtering options are also available to help you find just the appointments you're looking for. Simply click on the appointment icon to show only appointments in the Activity Stream.

Creating an Appointment
Video Guide
Watch this short video that covers all the elements of creating an appointment, including using snippets, creating reminders and sending invites to participants.
From a Project
- Click on the Appointment button from the activity toolbar at the top of any prospect, sales project or account growth project.

- A new appointment opens. This is where you can add all the details about the appointment you are creating.

- Select what type of activity this is from the drop-down list at the top. In this example, we will create a Demo Meeting.
- If you like, you can set a reminder for this meeting by clicking on the bell icon. Reminders are sent via email or Membrain Guide to a customizable time before the meeting. You can set the default settings for reminders in the calendar section of My Settings.
- Set the date and time for this appointment, and select if it how often it should repeat if it is a recurring appointment. Read more about this, here.
- Add a location (your office, customer site, etc.) or, if this will be an online meeting, and you're using the Zoom integration or the Teams integration, click on the Zoom or Teams icon to create the meeting automatically. You will see the meeting details added into the Description box.

- Add the participants for this meeting. The dropdown list will populate with the contacts from the company and related Prospect, Sales Project or Account Growth Project.
- To the right, you will see the related company and prospect/sales project/account growth project. Note: This is automatically populated from where you have started to create the appointment. You can click to change this information, or add via the blue box if nothing is prepopulated (see creating appointments out of context below).
- Under the Related area, you will see the Details area. This is where you can add information about the appointment itself using the custom fields that have been added for this activity type. Learn more about Activity type management.
- Enter the details for the appointment in the Description box. Here, you can quickly add a Snippet of information (like a predefined agenda) to save time.
- Select who the Organizer of this appointment is. The default option is set to be you, but if you're creating this appointment on behalf of a colleague, just change it to the person in question. Read more here.
- Click Create and Save, and decide whether to send invites to your participants from the options along the bottom. E.g you might want to send the invites later on, if you don't have all details like location or agenda in place yet.

Once created, the appointment will be visible in the Activity Stream of the related Prospect, Sales Project or Account Growth Project and Company and Contact page.
Additionally, when you open the appointment dialog, an Internal Meeting Notes box will appear below the Description box, for you to add your meeting notes.
Note: As you type in your notes, the Internal Meeting Notes box will expand.

From the Sales Calendar
You can very quickly create an appointment directly in the Calendar, either:
- Click on the New Appointment button from the left menu

OR
- Once in the Calendar, click on the "New Appointment" button, to your top right.
Tip! If you have a prospect, sales project or account growth project open in the background, this new appointment will automatically be related to it, otherwise, you will need to manually relate the new appointment to the relevant sales project.
From the Company or Contact
It is possible to create appointments from other areas of Membrain, outside the context of a Prospect, Sales Project or Account Growth Project. For example, from the Company or Contact view. However, you must remember to relate the appointment to the correct Sales Project or Prospect to ensure that it is logged correctly for tracking and reporting reasons.
You can do this from the blue box to the right of the appointment creation dialog.

Creating an appointment on behalf of someone else
In appointment scheduling, flexibility matters. That’s why Membrain gives you the option to create appointments on behalf of a colleague and choose whether the host is yourself or the organizer—ideal for team collaboration or when access to meeting tools like Zoom or Teams is limited.
When creating an appointment, you can use predefined locations such as “Our Office and ”Their Office” which pull your own respectively your client's addresses, as well as create an online meeting with yourself or your colleague as a host.
It’s all designed to remove friction and keep your sales process moving forward—fast, collaborative, and always customer-first.
Here’s a step-by-step guide for selecting locations and host when setting up an online meeting in Membrain:
- Go to your calendar and click on Create Appointment, or Edit Appointment if modifying an existing one.
- In the appointment dialog, go to the Location field, and click on the "More Options" arrow button to the right.

-
Choose a location and/or host, as follows:
- Our Office (your organization’s registered location)
- Their Office (your client's registered company address)
- Current User (you) as Host – If you are initiating and hosting the meeting.
- Organizer as Host – Useful if you're setting the meeting up for a colleague who will host.

- Complete any remaining details in your appointment and press Save.
Considerations
It's important to understand that if you have specific Activity Goals relating to appointments, you must ensure the following is true in order for these activities to be counted towards these goals:
- You are set as the organizer
- Appointment type matches your goals
- The appointment is related to a project and process that matches your goals


