Popular Content
Membrain for:
Activity levels play a crucial role in all types of sales, particularly when you're prospecting and building your pipeline.
Naturally, there are different types of activities that you want to track - whether it's emails, meetings booked or proposals sent to give you better insight into the amount of time and effort being spent on a particular Sales Project or Prospect. Activity Goals can be applied to team members to help motivate and keep up the right level of activity for each opportunity. And activity custom fields can be added to certain activities, allowing you to track whatever is important to your organization for that particular activity type. Learn more about Using Custom Fields with Activities.
Admins can create, edit, merge or delete Activity Types from the System Setup area of Membrain. Follow these steps to create a new Activity Type:
Navigate to System Setup > Settings > CRM > Activity Types.
In the Usable For section, choose one or more applicable Activity Type options (e.g., Task, Note, Appointment, Call, Mail, or Coaching Activity). Choosing this icon will limit where this activity can be used. Each option is represented by an icon:


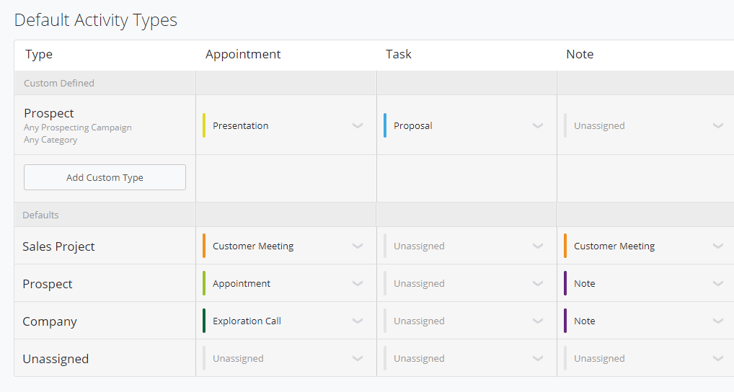
To make activity tracking even easier and more automated, you can use Membrain's functionality for Default Activity Types. So rather than relying on each individual sales professional to remember to enter the correct type of activity each time, you can set up default activity types, based on where in Membrain the activity is created.
For example, a phone call in a Prospecting Campaign will default to "Exploration Call" or an appointment in the 1st Stage of a Sales Project will always default to "First Meeting" automatically. Taking away an extra step for the Sales Professional, and helps them easily track their activities and work up to any goals that have been set for them on activity levels.
Use the visual grid of activities to help you plan out where and when you want your custom activity types to be assigned to as defaults.
In Elevate, Activity Types provide flexibility in managing Coaching Sessions by allowing administrators to create tailored options to match coaching objectives. These types can be configured under Elevate Settings > Activity Types, where you can define a name, permissions (Selectable By), default content, and color for each type.
When setting up a Coaching Session, the Activity Type selector allows users to choose the appropriate type from the list. If default content is associated with a selected type, it is automatically loaded into the session notes, streamlining preparation.


When archiving a default activity type, you will see a yellow flag at the top indicating that the archived type is still mapped to other default activity types. To resolve this, you will need to remap the affected default activity types to a different, active activity type. Please note that you cannot remap them to the archived type, as it cannot be selected again.
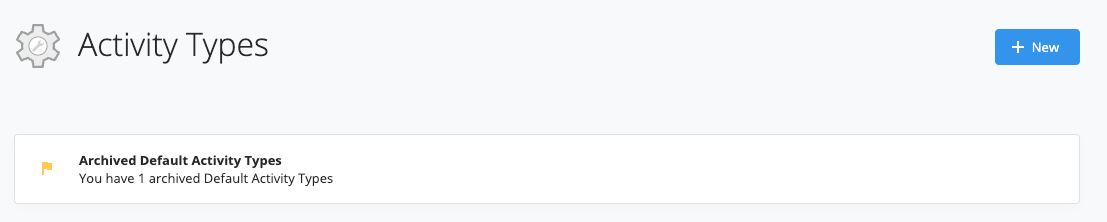
Please note that you cannot create new tasks with an archived activity type, unless it is one of the default activity types. You can still edit existing activities that have the archived activity type. If you change the activity type from the archived activity to an active activity, it cannot be changed back to the archived type.


